We cannot stress enough that tube preparation is essential to obtain a quality weld. The same goes for tube-to-tube-sheet welding, so it is very important to not neglect this step.
There are three phases in the process of welding tubes to tube sheets where problems can occur:
- The preparation of the tubes
- The preparation of the tube sheet
- The connection between tube and tube sheet: welding position and tube rolling (in this order)
Just like with the classical approach to tube working – preparation first, welding second – the world of exchangers often creates more complex situations.
The Preparation of the Tubes
The Cut:
The preparation is an essential step, as it makes the following operations easier. It is even mandatory if you want to be able to repeat the quality of the joints. The cut must be perfectly perpendicular and without burrs, since the next step requires the tube to pass through the tube sheet. An orbital cut is strongly recommended in this case, especially if there is no need to adjust the length of the tubes.
The quality of the tubes, the tolerances of ovality, and the variation of thicknesses are obviously also of major importance.
If an adjustment of the length is necessary, cutting the tubes orbitally is still recommended for the "burr-free" quality in order to ensure the tubes pass through the tube sheet easily.
Overlength or Trimming:
In this case, after the tube has passed through the tube sheet, a squaring machine with an internal grip is used to repeatedly bring the tube sheet overhang to the right value. Indeed, on great lengths, a precise positioning can be difficult.
The Preparation of the Tube Sheet
Tube sheets are machined and therefore the holes are very accurate. The end of the hole can be beveled before the weld to ensure a stronger connection under extreme circumstances (temperature-pressure). In such cases, the welding will be done with filler wire and will require a multi-pass approach.
The Positioning of the Tubes in the Tube Sheet
Depending on the requirements of the applications, the positioning differs. Possible types are illustrated below:
The positioning of the tube on the tube sheet depends on the intended application and the strain that the heat exchanger will be undergoing. The manufacturer of the heat exchanger determines the positioning during the design process. This influences both the preparation of the tube sheet and the positioning of the tube.
It is therefore important to consider the following aspects:
- How can the positioning be made repeatable?
- How can the tube, a raw element with many possible variations, be adjusted to the tube sheet, which is manufactured with precision and within controlled limits?
- If the connection is welded, how can one ensure that the tube is centered in the tube sheet?
What is the best way to release the welding gases to avoid craters related to the evacuation of these gases?
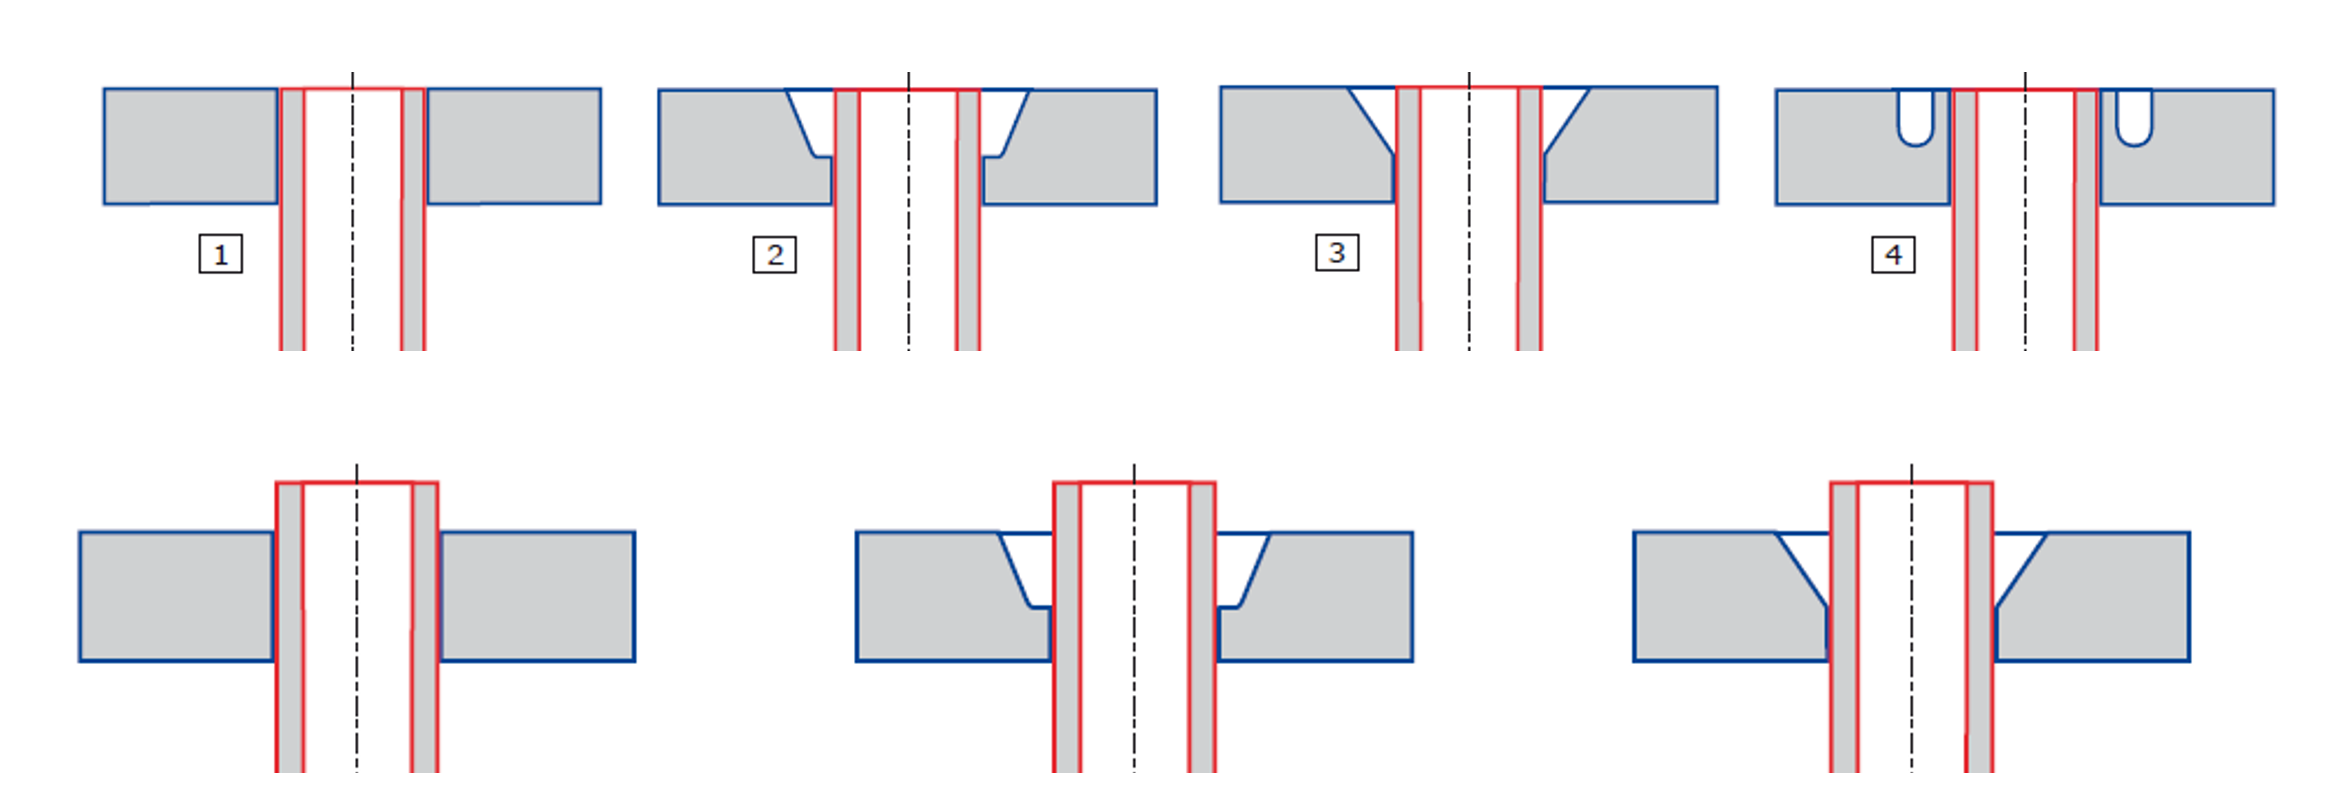
Let's look at a typical configuration where the end of the tube is aligned with the tube sheet.
In this example, 3 steps are essential for a welded connection:
- The centering
- The weld
- The rolling in after the weld
Centering:
This step is often skipped, but it allows perfect repeatability and avoids welding defects that can result in serious consequences. The main situation where a defect can occur is when there is a gap between the tube and the tube sheet. This often happens towards the end of the welding process and can create fusion defects or holes.
What is centering exactly (as opposed to tube rolling)?
Here is an exaggerated configuration of the assembly before welding:

If there is too much space between the tube and the tube sheet – don't get us wrong, there needs to be a little wiggle room in order to get the tube through the tube sheet – during automatic welding, this space will potentially increase and the weld pool may miss the tube/tube sheet joint. Also, the energy may be overly concentrated on the tube and fuse only the tube and not the tube sheet.
Please note: this is less of a problem when welding in manual TIG because the operator can account for the gap that exists as he sees it and adjust the position of his electrode or even scoop the weld bath from the tube sheet onto the tube.
In orbital TIG welding, the rotation of the electrode is pre-set and therefore cannot adjust to the existing gap.
To avoid this problem, the tube must be centered on the tube sheet, e.g. the tube must be deformed at the end so it touches the tube sheet. Centering guarantees zero slack and full contact between the end of the tube and the tube sheet.
ATTENTION: You might have the automatic reflex of using a tube rolling method to bring the tube and the tube sheet together, but this is a mistake you should not be making. In fact, this method creates a surface contact over a very long length and traps the welding gases, creating a degassing phenomenon (explosion of the weld bath when the gas escapes) and thereby a welding defect.
Contrary to tube rolling, centering creates a contact only at the end and gases can therefore easily escape from the weld bath.
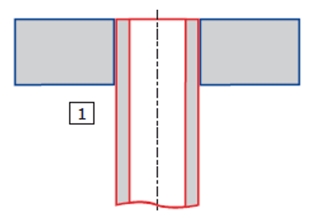
To center the tubes on a tube sheet – a step that is often skipped – there are specific tools of which we will introduce one here as an example.
What you can see here is a hydraulic version of a TDA centering machine. It allows you to control the shape at the end of the different types of tube-on-tube-sheet positions.
Once the preparation ensures contact between tube sheet and tube and the weld bath can evacuate the gases, the orbital weld will be perfectly repeatable so optimal quality is guaranteed.
Let's not forget that tube sheet welding is a serial operation and therefore requires a serial approach to repeatability of actions and results.
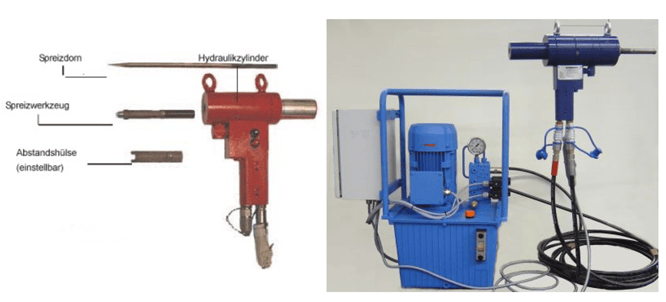
Orbital Welding
Welding tubes to tube sheets can be done using either manual TIG or orbital TIG. The difference is significant since – compared to manual welding – one operator can pilot two orbital welding heads simultaneously which increases the welding output significantly.
Orbital welding therefore saves time and improves the quality of the weld. All welds are documented to ensure optimal traceability of the welding process. Let's not forget that these assemblies are welded because they are subject to great strain in the customer's application.
The orbital welding of a tube to a tube sheet is executed either with or without wire, depending on the desired characteristics.
The machine used at AXXAIR in these cases is the SATP-80x pictured below:
Tube Rolling:
This operation, when the tube has been welded to the tube sheet, is done after, in order to avoid retention zones between the tube and the tube sheet thus ensuring a better longevity of the product. This step consists of deformation by rolling from the inside of the tube through expansion of the rollers and rotation until the tube and the tube sheet touch. The tube rolling machines are generally equipped with a torque handle for better control.
We want to once again emphasize how important preparation is throughout the different steps: the preparation of the tube, the preparation of the tube sheet, the positioning of the tube in the tube sheet, the centering, the orbital weld and finally the rolling.
