The choice of shielding method will depend on the application. For tube welding, the simplest method is balloon or puddle containment. Groove containment is used for linear welds. If the configuration is more complex, the use of a trailing torch – a versatile tool that is easy to set up – is recommended, provided that the welder can intervene directly.
What techniques and different tools can be used to measure
the level of oxygen remaining in a tube?
An oxygen meter is a tool that measures the amount of oxygen in the ambient air. This value, the amount of oxygen remaining, is expressed as a percentage. It can be useful when going down a sewer for example, seeing as they emit gases. As carbon is heavier than oxygen, it is vital to check the oxygen level while going down to avoid danger zones.
For welding, it is crucial to be able to measure the residual oxygen level in the air at all times, which should not exceed 0.0001%. If a device is used that measures between 0 and 20 %, the welder will not be able to know whether the threshold value for welding has been reached. It is obvious that this type of device is not at all suitable for executing welds and that it makes more sense to use a PPM (parts per million) reader. This tool delivers a much higher accuracy by measuring up to the fourth digit behind the decimal point.
At what oxygen level should the weld be started?
Root porosity occurs at an oxygen level of 500 to 800 ppm. The discolored part is more than dangerous – at this stage we will assume that the weld has hardly been inert. 800 ppm corresponds to 0.08% oxygen, a figure undetectable by a standard oxygen meter.
The threshold value, meaning the accepted percentage at which the weld will be triggered, can be configured precisely to meet the requirements of the specification. For sensitive industries such as the pharmaceutical industry, welding will be done with oxygen levels below 100 ppm, resulting in a very clean weld. For the strictest environments, the accepted values will sometimes be at only 20 ppm. AXXAIR power supplies provide the user with a table showing the different colors according to the oxygen level in ppm.
How much does a PPM reader cost?
Needless to say, you should not pinch pennies when it comes to investing in a tool like this. Basic oxygen meters are available from 100 Euros, while a PPM reader will cost between 700 and 3000 Euros. It is more than obvious though, that these two products cannot be compared.
This very precise tool is more than necessary when welding at very high standards. For more basic applications where inerting does not play such a crucial role, it can of course be done without one. This is why AXXAIR offers this equipment as an optional add-on for the entire range of its orbital welding power supplies.
How to choose the proper shielding gas
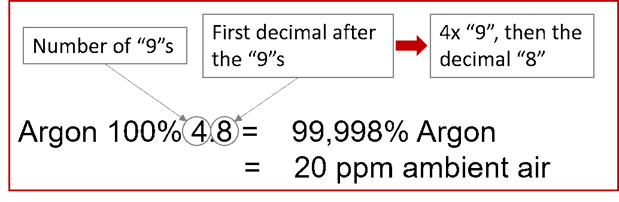
Gases are classified according to their purity, described by a two-digit label: 4.6, 5.2, 6.0 etc. The first digit corresponds to the number of “9”s and the second digit expresses the first number after the “9”s. So the purity of a gas described with 4.8 corresponds to a gas whose fourth digit will be an 8. If the user buys 100% argon, the gas will be 99.998% argon.
As a consequence, the other 0,002 % are the 20 ppm of ambient air, made up of about 20% oxygen and the other gases in the atmosphere. The choice of gas and its purity must be in line with customer requirements.
But let’s not forget the other parameters playing a crucial role:
- The quality of the pipes connected to the gas cylinders
- The cleanliness of the tubes to be welded, since dirt can release gases at high temperatures
- The quality of inerting using flanges or non-hermetic balloons
- Sufficient flow, sufficient gas outlet
- The density of the gas
- The positioning of the gas inlet and outlet
The slightest discrepancy in this entire chain will provoke a welding defect.
When should the oxygen levels be measured?
The answer is as simple and straightforward as it gets: before, during and after welding. Of course, the arc should not be started before checking the quality of the inerting. The oxygen level must be checked throughout the welding process (Remember the risk of poor gas diffusion or air currents?). It is obvious that if the inerting is stopped instantly after the completion of the weld bead, the result will suffer because the overall temperature of the workpiece does not drop immediately.
For a tube made of stainless steel for example, it is necessary to wait until the work piece is cooled down to a level below 150 to 200 degrees Celsius to avoid any post-weld discoloration.
What means of control are available?
The primary means of control will always remain common sense. Use consistent parameters. For standard piping assemblies with diameters ranging from 1" to 6", inerting is performed at between 5 and 10 liters per minute. The gas outlet will have to be correctly dimensioned so that the pressure inside the pipe does not rise. Again, there is a simple rule of thumb: a hole with a diameter of 5 mm is supplied with 5 liters per minute.
So, means of control are an adapted flow rate, proper dimensioning of the gas outlet and above all: a good dose of patience. Many welders start the arc too quickly before making sure that the inerting is executed well in order to boost productivity. And there is a reason for it: if the ideal inerting time is calculated to be 3 minutes for example and the welder starts welding after only 20 seconds, this certainly makes a difference in the day's production. But this time saved has it’s cost at the end of the production process: if the oxygen level is too high, the quality of the weld is lowered and the tube risks becoming a scrap piece. This is why AXXAIR strongly recommends the use of a PPM reader, but here again the final requirements must be taken into account.
What to do when a stainless steel tube presents
with a golden or blue discoloration?
If, despite all these precautions, a golden or blue discoloration is visible on stainless steel, it is an indication to the welder that the chrome layer of the surface has been destroyed. In this case, it is always possible to carry out a surface treatment by passivation, which can be done mechanically with suitable tools. The metal is exposed and the entire chromium layer is removed over a large area. This protective layer will re-form in a few hours. The passivation can also be carried out with a chemical method or by electrolysis. In fact, many solutions for this problem can be found on the market.
Tracking the inerting
The welding procedure specification (WPS) will give you all necessary indications about the inerting parameters. Usually, the quantities and times of inerting are recorded manually during the entire process. Ideally, it is not the welder himself who takes care of this tracking, but rather a third party.
Thanks to the PPM reader from AXXAIR, this tedious work is a thing of the past. The reader is connected to a computer that records the variations in oxygen levels during the welding process in real time. In addition, the AXXAIR power supply is equipped with an electronic flowmeter that measures the gas flow so that the right amount of gas can be used to either avoid unnecessary overconsumption or otherwise add flow to achieve perfect inerting.

